# Spawning Manager - V1
First, before we can really dig into this, I have to outline some terms. Any time you dig into a system this complex, you can end up with a LOT of overloaded words. This has been a consistent problem in my career, where you think everyone agrees on a term, but it means multiple things to multiple people. Any proper system design architecture must strive to explicitly define your terms.
# Lexicon
This list will start short, but it will grow as we add more and more complexity to the system. When you see words that are surrounded by [ ], this denotes other words from the lexicon.
| Term | Description |
|---|---|
| Unit | This is an enemy monster, or NPC, that is to be spawned by the system. |
| Encounter | [Encounters] define the high level data that relates to spawning [Units] for combat. It has an assigned [Template], which defines what [Units] to spawn. It has been assigned a total [Value], which controls the quantity of [Units], and it generates a set of [Waves]. |
| Waves | [Encounters] do not spawn all their enemies at once. An [Encounter] might want to spawn 20 [Units], but for pacing reasons we divide them up into groups called [Waves]. The total number and type of [Unit] is defined in the [Encounter], but the timing of when things spawn is controlled by the [Waves]. |
| Templates | [Units] are grouped into [Templates]. Templates are created by designers at Tool Time to define the composition of [Units]. |
| Value | Individually defined on each [Unit]. This is used to control the quantity of [Units] allowed in an [Encounter]. It can also be thought of as the POINT VALUE of a [Unit]. It is how [Templates] and [Encounters] work together to determine the total number of [Units] in a [Wave]. |
# Overview
This can be a complicated system to picture in one’s head, so before getting into the specifics of the system, I’d like to start with a quick example, and then a visual summary of that example.
That should help to create the correct model of the system in your mind.
# Basic Example
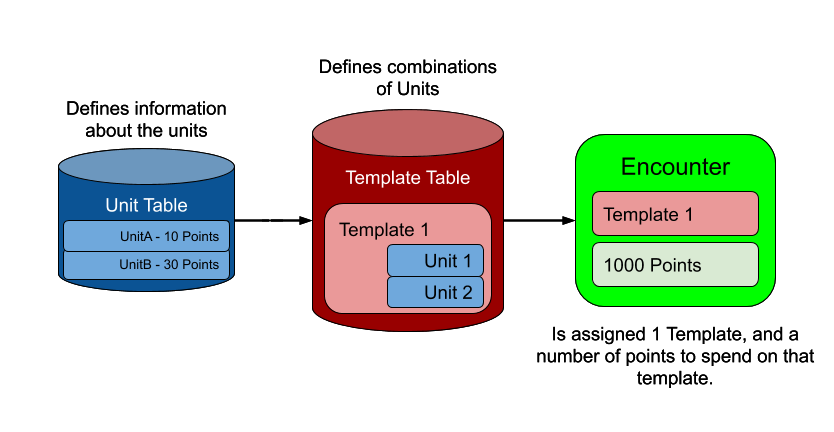
The Spawn Manager is built upon pre-designed Templates and Point Values, which designers have set up at Tool Time. At Game time, an Encounter is given a number of points that it wants to “spend”. Each Encounter is also assigned a Template, and then each Encounter “purchases” units from its Template until it runs out of points.
Click to view an example case
# Units
Let’s assume we have 2 units in the game, A and B. In our engine we have a table which assigns these units a Point Value, and a Health Value
- A – 10 Value – 100 Health
- B – 30 Value – 300 health
# Templates
Let’s assume we also have 1 Template, which contains both of these units.
# Encounter
Lastly, we have an Encounter with 100 points to spend.
This encounter has been told to use our Template with units A and B, and it has been told to spend at LEAST 100 Points. It can go over, as it must include AT LEAST 1 of each unit, even if that forces it to spend more than it’s allotted points. This gives us three possibilities.
| Possibility 1 | Possibility 2 | Possibility 3 |
|---|---|---|
| 7-A, 1-B | 4-A, 2-B | 1-A, 3-B |
# Visual Overview
# Document Structure
Going forward from this point, I will be covering the major features of this system. Topics will proceed in the following order:
- Global Data
- Unit Information, and Assigning Units to Templates
- How we Spend Points
- Constructing Waves for Pacing
- Extended Example Case
- Problems That Exist...
I’m going to start by talking about global data. The general rule of this system is that specific rules override generic rules. By that same token, your goal, as the designer, should be to solve your problems in the reverse order. You start by solving your problems in the generic case, and if the problems persist you move to the specific.
After talking about the global data, we’ll talk about Unit Tables and Template Tables. This is the primary data for this system. This is how we determine the COMPOSITION of our fights. Once the system’s architecture is complete, you can balance the entire game from those two tables. This will segue directly into how points are spent.
Spending Points is how the system determines the QUANTITY of each unit that it wants to spend. But just dumping them into the scene in a giant chunk would not be very fun, so next we will talk about how it breaks all those enemies up into WAVES for gameplay pacing purposes.
At this point, the system will be a bit difficult to picture in your head, so I will give you a more detailed example of the system in action, so you can see how all the pieces fit together.
Lastly, once we are done, I will talk about the problems that this system is failing to solve, or problems that it has created. That is where this article will end, but in the next article, which covers a version 2.0, we will solve those problems.
# Global Spawning Data
The power of this spawning system lies in its centralization of data. Once the architecture is complete, the entire game can be balanced from two or three tables. You will be amazed at the time it saves you, ESPECIALLY as you begin to tune the difficulty of individual cast members. As an example, have your playtests revealed that there are too many “sword-wielding enemies”? Why go through EVERY level, find EVERY encounter in those levels, check to see if they are spawning the sword enemy, and then adjust them? Instead, just increase their point value in one table and know that the entire game has just been adjusted.
Initially, this architecture will feel stifling, as the global definitions won’t perfectly meet the gameplay needs of your individual enemies and situations, but that is why this system has a philosophy of “Specific Rules override Generic Rules.” Eventually, we will add authorship controls to solve those problems; HOWEVER, if you START there, at full authorship, then you are not using this system to its truest potential, so it pays to start here, in a global context.
There are two bits of global information for this system: Unit Archetypes Categories, and then some Global Spawning Settings.
# Unit Archetypes
Units are organized into archetypes. You can call these whatever you want, but the goal here is to be descriptive, yet generic, because your buckets should be generous. If you end up with 20 archetypes, you have broadly missed the point of this process. My categories for this example system:
- Pest — Easy enemies meant to be fought in large quantities.
- Melee — Basic enemies that fight you in melee.
- Ranged — Basic enemies that fight you at range.
- Heavy — Strong enemies meant to be fought in small quantities.
- Boss — Singular enemies that are set pieces to an entire fight.
# Global Settings
The next bit of global information is a table that defines global spawning data.
- Unit Spawn Delay
- Wave Spawn Delay
- Minimum Quantity
- Percent of Total
- Health Trigger %
The Unit Spawn Delay is the amount of time, in seconds, that the system must wait between spawning a unit, while the Wave Spawn Delay is the amount of time, in seconds, that the system must wait before spawning an Activated Wave. If there is one thing that I hate in a system, it’s “Synchronized Swimming”, which is everything happening all at the same time, together, in unison. Nothing will make your system feel more fake. These delays are important.
Minimum Quantity and Percent of Total are properties of how it breaks enemies up into Waves, and Health Trigger % is how the system decides when to spawn waves. We will talk about what those mean when we get there.
Now that we’ve got some global settings, let’s set up our Templates.
# Templatized Enemies
I do not wish to belie the difficulty in setting this system up. It takes concerned effort to author and maintain. You might be wondering what kind of authoring is needed, within a system that is meant to be driven algorithmically, and the answer is that full automation of your designs is never what you want.
One of the areas that I like to maintain authorship is in defining the compositions of enemies that make good, fun combat encounters. Don’t get me wrong, there are definitely ways you COULD drive this algorithmically, but there are going to be combinations of enemies that, on paper, shouldn’t be all that fun, but ARE fun; similarly, there are enemies to which expressing why they aren’t fun together can be difficult.
Enter the Unit and Templates Tables
# Unit Table
The Unit Table is where you define all the relevant data for your Units. Initially, let’s start with the most BASIC data related to spawning. We’ll add additional complexity in later articles to show how you can enhance the system. But for now, the basics.
In the Unit Table are the following fields:
- Unit ID
- Value
- Archetype
# Template Table
The Template Table is where you define combinations of units that you feel play well together. This is NOT where you worry about how many units will spawn! Your only goal here is “these units play well together.”
In the Template Table are the following fields:
- Template Name
- Unit ID List (1..n)
# Spending Points
When determining the Units to spawn, Encounters are given two things:
- A number of points to spend, and
- A Template on which to spend those points.
The Encounter uses the following rules when spending points on Templates:
- It must always spawn 1 of every unit, even if this will cause it to spend more points than it has available.
- It chooses units randomly
The system spends points in the following manner (the term “Buy” here is shorthand for “Spends points on that unit type and deducts it from the Total Points this Encounter may spend”:
- Buy 1 of each Unit
- Have we spent all our points, or are we out of Units we can buy, then quit, if not continue
- Buy 1 Unit at random
- Remove any Units that are now too expensive
- Repeat Step 2
Now that we’ve got our selected units, it’s time to divide them up into Waves.
# Waves and Conditions
This will be the most complicated part of our initial architecture, but it’s a very critical part. I have stripped functionality from other areas to help draw the focus into this area, as we must not forget our goal for this system. The GOAL of this system is not “automate a random distribution of enemies”. That’s EASY. Our goal is “automate the authorship of fun combat encounters.” At every step of the way, we must ask ourselves if the output of our system is creating FUN COMBAT.
One of the key ingredients of well designed combat encounters is good pacing, and good pacing is controlled by breaking up your enemies into groups. This will not hold one hundred percent true for ALL games, but in a lot of games you must not drip your enemies out one at a time, or, even worse, all in one giant chunk. You must sort them into groups, which arrive together based upon defined trigger conditions.
There are three steps to this process:
- Create Homogenous Waves
- Combine Homogeneous Waves into Composite Waves
- Assign Trigger Conditions
# Step 1: Create Homogenous Waves
Homogenous Waves are created by recursively dividing up the total number of Units we wish to spawn. It does this through two rules that we defined up above in the global settings:
- Minimum Quantity — Waves cannot be divided up if resultant new waves would have LESS than this number.
- Percent of Total — Waves must be divided up if they account for MORE than this percentage of total units.
Both must be true for it to continue. The sequence of events is as follows:
- If the resultant waves would contain more than [MINIMUM_QUANTITY] units, AND if the current wave is greater than [PERCENT_OF_TOTAL], then it takes the units and evenly divides them between two new waves.
- There can never be a fraction of a unit assigned to a wave.
- It recursively repeats this process on those newly created waves.
Lastly, it sorts the Waves by their quantity of units from MOST to LEAST.
A Quick Example of the Process
Let’s assume we have an Encounter that has already determined the quantity of units that it wants to spawn.
- Unit A – 45
- Unit B – 10
And let’s say we have the following global settings:
- Minimum Quantity – 5
- Percent of Total – 25%
That would result in the following homogeneous waves:
- Unit A – 45 => [23, 22] => [12, 11, 22] => [6, 6, 11, 22] => [6, 6, 11, 11, 11]
- Unit B – 10 => [5, 5]
In the case of Unit A, it cannot further divide up the sets with 11 as (11/45) = 24%, which is less than 25%. In the case of Unit B, 5 is equal to the Minimum Quantity of 5, so they cannot be divided up anymore.
The final waves after sorting them:
- A – [11, 11, 11, 6, 6]
- B – [5, 5]
# Step 2 Composite Homogeneous Waves
Now that we have created a bunch of homogeneous sets of units, it’s time to combine them into the final waves that will spawn in the game. This process is simple (for this version). We take the arrays of sorted units (remember, we sorted them from MOST to LEAST), and we combine them as if they were all stuck into a “Right Aligned” matrix.
This is easier to understand visually, so here is another example.
Let’s assume we are using the waves we created above:
- A – [11, 11, 11, 6, 6]
- B – [5, 5]
If you were to picture them as a “right aligned” 2×5 Matrix, it would look like this:
| Wave 1 | Wave 2 | Wave 3 | Wave 4 | Wave 5 |
|---|---|---|---|---|
| 11 | 11 | 11 | 6 | 6 |
| 5 | 5 |
This gives us the following composite waves:
- Wave 1 — [11A]
- Wave 2 — [11A]
- Wave 3 — [11A]
- Wave 4 — [6A, 5B]
- Wave 5 — [6A, 5B]
# Step 3: Assign Activation Trigger Conditions
We’ve got our waves, but what causes them to actually spawn? By default, all of our waves are considered “deactivated”, which means they will not be spawned into the scene. We need to activate them somehow, but we also don’t want them to all activate at the same time as that would entirely defeat the purpose of them being broken up into waves!
For now, let’s give ourselves a really simple set of rules:
- All waves start deactivated.
- Push waves onto a stack in reverse order.
- The first wave activates automatically.
- Any wave that activates decides the activation trigger for the next wave on the stack.
Given this set of rules, Wave 1 would spawn automatically. Wave 1 would then define the conditions necessary for Wave 2 to activate. Once Wave 2 activates, it would then decide the rules for Wave 3 activating, so on and so forth.
A special note: depending on your activation trigger, you could end up with multiple waves active at the same time. That’s an intended aspect of our system, but it is certainly something to which you need to be aware.
The trigger condition we are going to start with comes from our global parameters, the health trigger %. This refers to the remaining health of the activated wave, with regards to the total amount of health in its entire wave.
# Problems with this design
Hopefully you are beginning to see how the system works. This is, of course, just the very first iteration of the system, and there are several problems. However, had I started with the FULL system, it would be quite difficult to explain, and, without an understanding of WHY we added them, several parts of its architecture could seem extraneous.
To that point, here are just some of the problems with this current design:
# Where are the enemies even spawning in the world?
Currently, we have no way of giving this system a context of the environment. You have probably been wondering, even, how things even spawn into the world, as I haven’t really talked about WHERE it places enemies.
This will actually be one of the focuses of the next iteration, but there are some other problems related to this that we will also be fixing at the same time.
# Our compositions are way too random right now
True randomness is almost never want you want with a system. The current architecture of our spawning manager will create a very wide swing in unit counts, depending on how the dice rolls. We want to GUIDE the randomness into something more pleasing. Remember our goal!
We won’t really cover this until version 3, but eventually we will be adding some more logic and rules that dynamically updates the percent chance to choose a particular unit when building the encounter based on some new global values.
# Very little authorship control
The designer has very few knobs they can turn for this system. That was by choice, for this initial version, so I can show you how you should THINK about a system like this. Always start from the most generic height possible, and then move to the specific. You will thank me later, as it can get very complicated once a bunch of these layers are interacting.
Some areas where we will be returning authorship controls:
- Just one encounter?!: We’ve only talked about this from the perspective of ONE Encounter. Wouldn’t your level have MORE than one encounter? How do we give the user control over that?
- Unit Spawning Rules: Every unit in an archetype spawns in exactly the same way, when obviously you might not want that.
- Minimum Spawn Counts: There are times where, for a given Template Composition, it never makes sense to spawn a certain unit at counts smaller than a certain size, and we want to give designers that kind of control.
- Wave / Encounter Trigger Conditions: Currently the player has very little control over when waves activate, and even the kind of trigger conditions that the wave might use for a particular encounter. Giving more control over the FLOW of a particular combat encounter is another big feature we will be tackling next.
There are more problems, but we will talk about THOSE when we finish version 2.0. I’d like to close with a little interactive toy that allows you to play around with Unit Values and Templates so you can see how that affects the creation of Waves. Once you feel you’ve got a good understanding, move on to Version 2.0!